Flag Animation with Blender
Earth with Clouds
Modeling a glass in Blender
How to make a pencil in Blender
Making a chess pawn in Blender
Plastic Juice Bottle in Blender
Screw in Blender
Showing posts with label 3D Objects. Show all posts
Showing posts with label 3D Objects. Show all posts
Saturday, 24 May 2008
Blender Tutorials
A round up of some Blender tutorials I've found. The objects themselves might not be particular useful but it's good modelling practice. The 'Earth with Clouds' one is interesting though...and has potential to turn up in one of my Terragen renders soon ;-)
Wednesday, 26 March 2008
The Day After Tomorrow

Wednesday, 30 January 2008
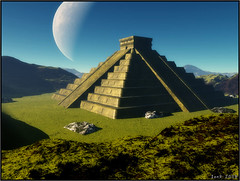
Maya Pyramid
Monday, 7 January 2008
BlenderCourse

Anyway, I found a little course here which seems to fit better with the way my brain works...a few short lessons with a challenge to try yourself after each one. These are some of the results I produced from the course.
Saturday, 27 October 2007
The Speaking Ring
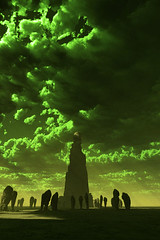
I used this tutorial as a starting point for the tower. The stones in 'the speaking ring' are from a 3D object I got from here.
Monday, 25 June 2007
The Blender of the North

I've started learning Blender so I can make my own 3D models to combine with my Terragen landscapes. This is my first blender model in a terragen landscape. The model reminded me a bit of the Angel of the North...so that's where the title came from :-)
Here are some notes on what I learnt exporting the model from Blender and bringing it into Terragen...
Creating the model: I followed this beginner's tutorial here
Exporting from Blender: Was fairly straightforward. I exported as a wavefront (.obj) file. You get quite a lot of options so I was expecting a bit of trial & error to get the object out how I wanted it, but just accepting the defaults seemed to work fine. (Except that the first time I got an obj file with no object in it...but that was because the "Selection only" option is on by default and I didn't have my object selected!)
Saving the file in Poseray: If I just added the object straight out of Blender into Terragen then it crashed when rendering. But I found that opening it in Poseray and saving it again worked fine. Oh, and I also carried out the two steps that I found in this forum post.
Positioning the object in Terragen: I mucked about for ages trying to get the model to stand on the mountain...rather than floating above it or buried half-way into it! The way I did it eventually was to add the object as a population - setting the size of the population rectangle and object spacing such that there'll only be a single object in the population. This way I was able to position it where I wanted it in the X & Y co-ordinates, and the Z co-ordinate was automatically positioned so that the object would stand on the ground. Phew! There's more details on adding an object population here.
UPDATE: A fellow member of the Google Terragen Group has posted some screenshots here showing the method he uses to place a single object in Terragen. Thanks dandelO!
Subscribe to:
Posts (Atom)
